NAUGHTY NEEDLEWORK
NOTEBOOK COVER
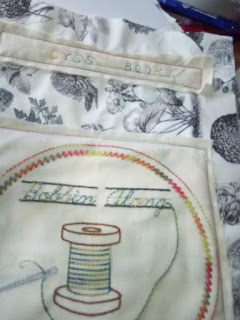
While i was unpacking a few crafty boxes yesterday (we've moved) i came across this nearly finished Naughty Needlework and decided to finish it.
As i was working on the final stitches i decided that i didn't want it to be stuffed in a hoop and hung on the wall, i'd bought the piece for my own amusement and i wanted it somewhere i would see it. One of my project books needed a nicer cover and that was that.
I know i am in the middle of blogging the awesome stitchonaries but i couldn't resist showing you how to make this books cover as its easy to do and satisfying.
Ingredients
6 x sheets of A4 Card
An A4 Notebook
Temporary Adhesive for fabric or pins
Craft Yourself Silly's Floral Panel for cover
Naughty Needlework of choice...completed
Sewing Machine
Marathon Rayon Variegated thread
Supersoft Batting With Scrim
Ruler
Pencil
PVA
Heat Erasable pen
How To:
On two of the pieces of A4 Card measure 2cm along the long edge and cut off....these will for your spine and iff the book you have chosen to cover requires a wider spine you can simply measure to fit you book, the same if you require a smaller spine. Put the Spine Strips to one side.
Fold the remaining piece of card in half along the long edge and cut along the fold...these are for your inner flaps.
Take one of the remaining A4 sheets of card and use a small amount of adhesive to fix it to the batting...allow a 5mm edge if you are lining it up against edges. Cut all the way round with a 5mm overlap of batting.
Use the cut piece to measure out a second piece of batting, this will be for the cover...put to one side for the moment and repeat the process with one of the spine strips.
Use the A4 card on the back of your selected background fabric and draw round it 4 times with your heat erasable pen....if it is patterned remember to allow for pattern direction etc. and leave approx an inch between each piece.
Repeat this twice with the spine strip and four times with the inner flap card.
Measure and mark a 5mm edge round each piece and carefully cut the pieces out on the outer marks.
With a little bit of the temporary adhesive stick one of the a4 pieces over the batting covered A4 Card. Do the Same with all the other pieces except the one for the book cover...out this to one side.
Take the piece of Batting covered card and a piece with no batting and line them up together with the fabric facing outwards. Pin down one side.
Open the card up and apply a small amount of PVA to the card so they will stick together...this will add a little strength and rigidity to the finished piece. Pin round the remaining 3 sides to hold them together.
Repeat this with the spine and two inside flaps.
TOP TIP: When using your spray adhesives make sure there is nothing behind the piece you spray...Such as you mobile phone Grrrrr....LOL
Take the spare piece of cut batting and fabric and stick them together...trim your Naughty Needle work to the required size and pin into the desired position. I have used one of the off-cuts from the embroidery to create a title strip.
Stitch round the pinned piece of fabric with a simple running stitch...I went round each piece 3 times and deliberately made the stitching a little wonky.
My machine is basic but can do a simple text..so I've added my title.
Using running stitch, stitch round the pinned edges of all pieces to secure them together and remove the pins.
Go over the stitched edges with a tight zig-zag...sewing it so that on the left the needle is in the fabric and on the right of the zig-zag, the needle is free of the fabric.
For the edges of the inner flaps that will point towards the spine when the are fixed inside the cover i have run over the zig-zag a second time.
Place the back cover of the book and spine side by side under your foot...set the widest zig-zag you can...mine was a 6, and stitching so that on the left the needle falls on the cover and the right it is on the spine. Sew the length of the pieces to fix them together. Making sure the front is lined up correctly...repeat with the front cover.
TOP TIP: make sure you have stitched right to the edges of the two pieces as it can become a bit ragged if not secured well, if you are unsure....stitch it twice.
Lay the inner flap against the inside of the cover (on the outer edge as in the above picture. Zig-Zag all the way round the the outer edges of the book cover, securing the second flap to the back cover on the way. I went round a second time in the opposite direction to catch any stray thread that had escaped the 1st stitching. Insert your book.
Fray the edges of the Naughty Needlework and Header...Looks nice like that...no other reason.
If like me you are totally rubbish at turning corners, use some cheap metal corner protectors to hide the mess and protect the edges.
Keep the scraps of fabric...if nothing else they can be used in Powertex projects.
Keep the threads there are a lot of uses for these scraps...I keep mine in a jar and when the jar is full sort them into colour coded jars.
So there it is, a different way of using your Naughty Needlework and how to make a simple book cover all in one...If you are new to machine stitching i cant recommend the Running Stitch and Zig Zag stitch machine embroidery stitchonaries highly enough. By the time your finished those this project will seem easy.


