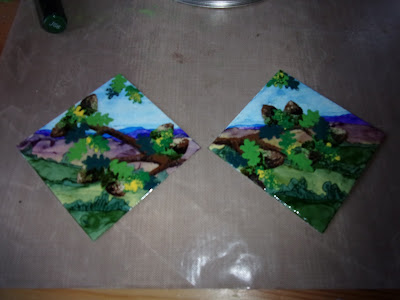
I created 2 versions of my twin tiles as the first attempt didnt produce the results i was after....although they are cool in themselves....Here i will show you how i created both sets of tiles. Starting with the second version...
Ingredients
* Efco Cold Enamelling Starter Kit* Aluminium Tiles
* Spectrim Noir Pens
Stencils created on coke cans using * Crafters Companion Mixed media dies and X-Cut dies
*Products purchased from Hochanda
How To Version 2
1. Both of the tiles i used here had used previously to play on....i coated them both with white Cold Enamel powder and 'fired' them in my little stove to create a white base to work on
2. Using Spectrum Noir pens and starting with the furthest point and work forwards...colour in the sky and distant hills
4. Keep moving forward until u have a landscape of sorts...i love the effects of the alcohol pens on the cold enamelling....almost watercolour...gawgeous
5.Using the coke can branch stencils add a branch to each tile and fire it....this will also fix the background into the cold enamel.....Once cool i added shading with the bullet tip end of a dark brown.
6.In several firings add acorns, shade with pens....then begin to add leaves
7. You will note that i have used 3 shades of green to create the leaves, while the starter kit only has one, to create the dark green i premixed some of the green with ultramarine blu and a dash of black and the light green is green premixed with yellow.
VERSION 1
Ingredients
* Efco Cold Enamelling Starter Kit* Aluminium Tiles
* Crafters Companion Mixed media dies
X-Cut dies
Coke Cans
*Products purchased from Hochanda
How To Version 1
1. Use 2 new aluminium tiles and key them with sandpaper...this seems to help the enamel stick to the tile but if you forget dont panic.
2. Create the sky with white and turquiuse...swirl with a cocktail stick and then fire, add some clouds by gently waving pot from left to right (white with a touch of black added) and refire
3.Tear a peice of paper to make a slightly wavy line and start building in the background firing between each application of powder...as the hills come forward feel free to add extra 'wonk' to the paper...for hilly effect.
4. To create the hedgerows i tore a wonky line out ofpaper and then went along and nibbled bits out of the tear to create trees
5. Now you have your background its time to die cut some bits from your coke cans....2 branches, 12 acorns, 28 oak leaves and the toadstool foreground...give them a gentle key remember to be careful, those edges are sharp.
6. Enamel all the die cuts in required colours...use a scrap of paper to separate colours...
7. Layer a fine coat of clear enamel powder and then add the enamelled die cuts and fire.....you will notice that the cuts wont lay flat...dont panic just make sure all your required peices are added and the fire one final time
8. When the final firing has softened all the enamel, remove and press a cold tile on top of the hot tile as hard as possible to push the metal cuts into the softened enamel.
I hope you have enjoyed these two versions of the same idea....Im off to play now lol


No comments:
Post a Comment